Water Cooled PC Build: Components & Challenges

“How would you build a computer to run X program?” This was the question I was asked during an informational interview. I remember freezing, not sure where to begin. Quite frankly, I couldn’t even list all the basic components needed for a build. I left the interview feeling disheartened, sure that I wouldn’t proceed to the next round (I didn’t), but determined that this was an area that I could improve and learn from. I decided I would address this knowledge gap directly. Having owned a laptop only since high school, I figured it would be a great time to build my own PC and learn in the process. I would like to stress it is by no means necessary to do a hands-on build in order to learn, and it is a privilege to be able to learn by creating. This was no small expense, and I plan on using this PC for several years to come.
Factors to Consider & Goals
Similar to many PC builds, my main factors were performance and cost. Early into my research I decided to try water cooling my unit as I found it to be a fascinating layer of a typical build. Since water cooling can become very expensive, very quickly, I balanced cost by using other hardware components that weren’t the latest releases.
My main goal and purpose was to learn more about PC builds and how parts interact with each other. I wanted to understand more about which specs to focus on, or what to consider for performance.
Planning & Components
Upon doing more research, building a PC is not nearly as daunting as it may look. All PCs have a pretty general set of basic components which I’ll break down here with some fairly standard definitions. I also included what I specifically used in my build, and some interesting technical aspects I came across.
Processor/CPU
The brain of the computer, the central processing unit. The CPU essentially controls the number of tasks that can be accomplished at once, and how quickly these tasks can be completed.
For CPU, a big factor is with the number of cores. The CPU core is the CPU’s processor, and back in the old days, every processor had just one core that could focus on one task at a time.
To help with this, there’s multithreading which allows the execution of multiple parts of a program at the same time, maximizing the utilization of the CPU by multitasking. This greatly reminded me of the Computer Design course I took in college. We wrote in Verilog, a hardware description language, to design a microprocessor. We implemented pipelining, which is a technique where multiple instructions are overlapped during execution. Best put in an analogy: Say an instruction came through and the task was to wash, dry, then fold your clothes. This would take much more time if you waited for the person before you to finish all 3 steps of wash, dry, and fold, before starting your wash. Rather, if you could start your wash when the previous person has moved on to their dryer phase, this would save an immense of time. With CPU pipelining, this is the same concept, allowing one core to process more tasks in a given amount of time.

However, technology has rapidly advanced with CPUs having much more than one single core. For example, AMD released Ryzen 9 5900X which comes with a whopping 12 cores and 24 threads. For reference, a quad core 8 thread would be plenty for gaming. For office work such as tasks like word processing, spreadsheets, emails- 2+ cores would work fine.
So why not get 12 cores? One factor is of course the higher cost associated, but also that a high number of cores/threads can actually be detrimental to performance, power, and cooling. In order to pack more cores, clock speed on each core is backed down a bit. Otherwise, the chip could burn itself out with so many fast cores going at once. A very high-thread CPU has much cost to a narrow set of benefits.
I ended up using Intel’s Skylake Quad-Core 4.0 GHz LGA 1151. Quad core is quite common now, and would suit my office work needs and even allow me to play some games.
Motherboard (MOBO)
The motherboard houses all the various components of the PC. Here, it’s important to factor in the other various components. For example, I used the ASUS Z170-A motherboard which has an Intel Socket 1151, compatible with the CPU that I chose.
Memory
Random access memory (RAM) allows computers to access files quickly and run multiple processes at once without lagging. I learned that typically 16GB (2 x 8GB) of RAM is plenty, but another important aspect is regarding speed. The speed or your processor and bus speed of the system motherboard are the limiting factors on speed of RAM installed. Though my CPU is at 4.0Ghz, my motherboard is only compatible with RAM speed up to DDR4 3200Mhz.
Let’s take a closer look into the actual speed of RAM and look at factors such as latency and speed. For example, RAM will have specs such as:
DDR4 3200
Timing 14–15–15–39
CAS Latency is the first number, so in this case 14.

Latency (ns) = number of clock cycles X clock cycle time (ns). Ideally, I would pick the highest memory speed supported by my CPU and MOBO, and withthe lowest latency.
Storage
I found the main options were between a hard drive, or a solid-state drive (SSD). I chose SSD as my storage device since it is quiet, reliable, has faster access time, and lower power consumption over HDD.
Graphics Processing Unit (GPU)
This is the graphics card, or video card. The purpose is the calculation of anything having to di with visuals and outputs these visuals (images, GUI, user interface) onto the monitor. I checked my motherboard had a slot compatible with my graphics card. Typically all motherboards will have PCI Express x16 slot. Because my goal is not intense gaming, I used a GPU that’s been out for a while, the EVGA GTX 980 Ti.
Power Supply Unit (PSU)
The power of electricity to bring your PC to life! A few physical differences here is with modular and non-modular power supplies. Non-modular PSUs have all the cables permanently attached. For the sake of cable management, I went with a modular PSU so I could pick and choose which cables I would actually need and store away the remaining. Another factor is with the efficiency rating on a PSU. This is a rating for how well the PSU converts AC power it receives from the outlet to DC power the components of the PC can use. For example, 80 Plus rating means there is more than 80% energy efficiency at 20%, 50% and 100% of the rated load.
Water Cooling
This actually became my favorite part of research. I’ve seen AIO (all in one) coolers referring to a liquid CPU cooler. However, doing a custom loop allowed me to route the pipes myself and helped me directly understand how it helps heat dissipation. I also found it fascinating to see all the different setups that can be achieved with a custom water loop, all while maintaining the same key components.
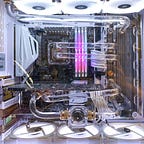
With water cooling, the main components are the radiator, fittings, tubing/pipes, GPU and CPU water block, and some type of water reservoir. I used a distribution plate. The path the water flows through: pumped from the reservoir, through to GPU, to CPU, through radiator and back into the reservoir. The loop is then repeated. See photo on the left, starting from bottom right corner “pump” and flowing to the top.
The radiator is the main function here, which cools down the liquid flowing inside the loop. As liquid flows through the copper tubing, the radiator’s fins absorbs the heat from the water. The fins are cooled by fans that are attached to the radiator. This cooled water is passed back into the reservoir and so the cycle repeats, cooling the PC.
Challenges
I encountered a physical build and heat issue. Regardless of the cooling system used, there is thermal paste that creates contact between the actual graphics processor and the cooling unit. I didn’t use enough thermal paste to make contact between the GPU water block and the actual graphics processor. It caused my PC to reach bios screen but immediately crash after. I remedied the solution by applying extra thermal paste, but also installed heat sinks as an extra precaution. Ultimately, heat sinks are several small aluminum alloy fins that allow heat to dissipate quicker. Aluminum alloy has one of the higher thermal conductivity values and is great for this purpose.
With the water cooling loop, there are additional holes in the distro plate that are possible locations the pipe could be placed. However, I learned it’s very important to ensure my pipes were connected in a way conducive to water flow. For example, the bottom of the plate is where pumped water is intended to go out, and into the GPU water block. When the water comes back into the distro plate from the GPU, this should go into a different vertical chamber. This chamber shares a connection with the output to the CPU water block, and so on. Without the proper connection, the pump will not push water through the plate at all.
Final Thoughts
For my needs, the PC I built has served me very well. I found a lot of conflicting information online regarding buying brand name water cooled components, but found the generic brand water blocks and cheap fittings has worked perfectly fine thus far.
Were I asked the same question now, “How would you build a computer to run X program?”, I’d immediately clarify with what the goals of running the application would be to further understand the scope. Are we prioritizing performance over cost? What type of application is this- a spreadsheet or an intensive game? From there, I could discuss a multitude of factors from the cores, speed, to different methods to cool the computer. I have much more confidence answering this question now, and I was able to build an awesome project in the process.